TENSILE TEST ON MS SPECIMEN
• Equipment required: Universal Testing Machine, Specimen and extensometer.

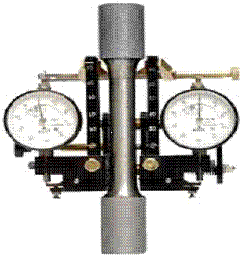
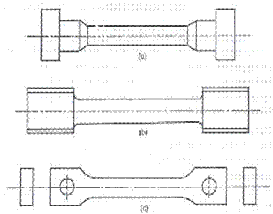
• In a tensile test of mild steel specimen, usually a round or flat bar is gradually pulled in a testing machine until it breaks.
• Two points, called gauge points, are marked on the central portion. The distance between these points, before the application of the load, is called gauge length of the specimen.
• The Load is applied gradually and at regular interval of loads extension is measured.
• The strains corresponding to the recorded extensions are calculated by dividing the extensions by the gauge length, while the stresses are calculated by dividing the loads by the original area of cross-section of the specimen.
• Stresses so arrived at is called nominal stress to distinguish it from actual stress which is obtained by dividing the load at a particular instant by the area of the cross-section at that instant
• Limit of Proportionality(A):It is the limiting value of stress upto which stress is proportional to strain.
• Elastic Limit:This is the limiting value of s
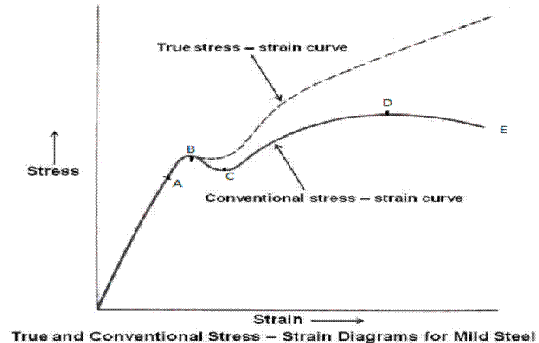 tress up to which if material is stressed and released, strain disappears completely and original length is regained. This point is slightly beyond the LOP.
 • Upper Yield Point(B):This is the stress at which the load is decreasing and strain increases. This phenomena is called Yielding of Material.
Stress=250kn/mm2
Strain=0.125%
• Lower Yield Point(C): At this stage the stress remains constant but strain increases for some time.
• Ultimate Stress(D): This is maximum stress the material can resist. At this stage C/S area at a particular section starts reducing very fast. This is called Neck formation. After this stage load resisted and hence the stress developed starts reducing.(370-400N/mm2)
• Breaking Point(E):The stress at which finally the specimen breaks is called breaking point.
Strain= 20-25%


High strength deformed bars


Compression test
• Equipments required:Universal testing machine, Compression pads and specimen.


• Place the specimen in position between the compression pads.
• Gradually increase the load till the specimen fails.
• Drawing stress-strain diagram we can determine Young’s modulus in compression and Ultimate compression strength.

Bending Test
• Equipments required:UTM or Beam apparatus, Bending fixture, vernier callipers, meter rod, test piece & dial gauge.


• Bending test is perform on beam by using the three point loading system.
• The bending fixture is supported on the platform of hydraulic cylinder of the UTM.
• The loading is held in the middle cross head.
• At a particular load the deflection at the centre of the beam is determined by using a dial gauge.
• To calculate Young’s Modulus we use following formula.
δ=WL3/48EI
Where W= load acting at the centre,N
L=length of the beam between the supports, mm
E=young’s modulus of material of the beam, N/mm2
I=second moment of area of the cross section (moment of inertia) of the beam, about the neutral axis, mm4

• And Bending Stress is calculated by following Eq:
σb =My/I
Where
M= bending moment, Nmm
I= moment of inertia, mm 4
σb=Bending stress, N/mm 2
y=distance of the fiber of the beam from the neutral axis.

Brinell hardness test
• Equipments required: Brinell Hardness testing machine, specimen of mild steel and Brinell microscope.

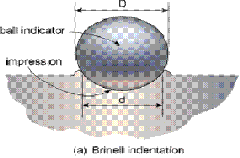
• In Brinell hardness testing, steel balls are used as indenter.
• Diameter of the indentor and the applied force depend upon the thickness of the test specimen, because for accurate results, depth of indentation should be less than 1/8th of the thickness of the test pieces.
• Make contact between the specimen surface and the ball(indenter) by rotating the jack adjusting wheel of the machine.
• Pull the load release level and wait for minimum 15 second. The load will automatically apply gradually.
• Measure the diameter of the Indentation
• Brinell’s Hardness Number is given by:
BHN = Load Applied (kgf.)/ Spherical surface area indentation (in mm.)
= 2P/πD(D-√(D2 – d2))
Mild steel – 110 -130

Rockwell Hardness Test
• Equipments required: Rockwell hardness testing machine, Black diamond cone indenter and steel specimen.


• Indenter used is the cone having an angle of 120 degrees made of black diamond and applied force is of 150 kgf.
• Hardness is measured in different scales (A, B, C, D, E, F, G, H, K).

Impact Test
• Equipments Required :
Impact testing machine
Specimen
Size of the specimen is 10mm X 10mm X 75mm

• Procedure :
• Measure the dimension of specimen and notch.
• Raising the hammer and note the initial reading, release the hammer to get the final reading.
• The difference between initial and final reading will give the actual energy to fracture the specimen.
• Repeat the test for different specimen.


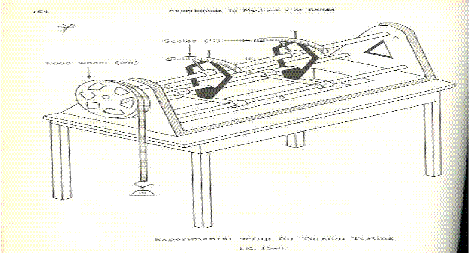
Torsion Test
• Equipments Required :
A torsion testing apparatus
Standard specimen of mild steel or cast iron.
Twist meter for measuring angles of twist
A steel rule and calipers and micrometer.
• Torsion equation:
• C –TL/Iθ
• Where T=torque applied,
• Ip= polar moment of inertia,
• C=modulus of rigidity,
• θ = Angle of twist (radians), and
• L= gauge length.
• Procedure:
• Prepare the testing machine by fixing the two twist meters at some constant lengths from fixed support.
• Measure the diameter of the pulley and the diameter of the rod.
• Add weights in the hanger stepwise to get a notable angle of twist for T1 and T2
• Using the above formula calculate C
Shear Test
• Equipment Required :
• Universal testing machine
• Shear test attachment
• Given specimen

• Procedure :
• Insert the specimen in upside down ie. One end at top and other at bottom.
• After switching on the UTM Bring the drag indicator in contact with main indicator.
• Select the suitable range of loads and space the corresponding weight in the pendulum and balance it if necessary with the help of small balancing weights
• Operate (push) the button for driving the motor to drive the pump.
• Gradually move the head control ever in left hand direction till the specimen shears.
• Note down the load at which the specimen shears.
• Formula :
ζ = 4W/2πD2
No comments:
Post a Comment